(If you click on the pictures, they should enlarge)
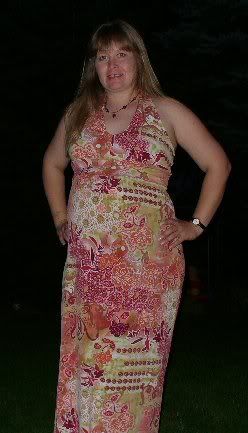
Ok, here is my second attempt at the enwrapture dress.
I ended up just buying a dress in order to get a template together to makr this. Here is the second version. With the exception of being too short (for me and my pregnant body, anyway), this is pretty close to a store bought one.
You will need for this dress at least 2.75 yards of fabric for the top (outer layer) and 3 yards for the botom (inner) layer.
I should also explain that I used a serger for almost the entire construction of the dress. If you don't have a serger, you will just have to hem all the edges.
Here is a small scale template for you to see how I the skirt part is made. This version fits me. I am a size 12 to 14 in pattern sizes. 8 to 10 in RTW size. I'm sure you can use these same measurements and go up or down a few sizes. If you need bigger or smaller, just adjust the part of the pattern that is 24 inches on my pattern. As that is the part that actually wraps around your body.

The actual pattern piece. It's pretty big.

You are going to need a lot of room to cut out these pieces. And in case you haven't figured it out yet, the left edge of the patten is CUT ON THE FOLD. I am fortunate that I have a lot of smace and a big mat. However, if you are a little more limited, I suggest using the floor, plenty of pins and a good pair of sicssors.

When you cut the bottom layer of fabric, you use the same pattern piece, EXCEPT you add 6 inches to the bottom edge only.

Now for simple instructions!
Finish all the edges. I used a rolled hem on my serger. Once all the edges are finished, sew the top edges together (The top edge is the curved edge, marked 24 inches). I used a quarter inch seam. Once you get that done, you have half the dress finished. All you need is straps!
Here is the dress just pinned to my dressform. The bitch is skinnier than me, so naturally the dress looks much more svelt on the dressform.

Now, it's time for the straps. The straps are easy, trust me. I just know that I am not a pattern writer, and my direction will probably suck. You might just have to play with them a bit to figure it out. But trust me, they are easy.
For the srtaps you can use either the top or the bottom leftover fabric. I used the top fabric for my straps. You are going to need about 8 yards of fabric for the straps. For yards for the front, 4 for the back.
Here is how I cut my straps:
I folded my fabric along the selvedge edge twice, then I cut off the selvedge. Then I cut 4 strips of fabric 3 inches wide.

To make the straps, I take two of the cut pieces, and sew them together at the short end.
Do that for the remaining two pieces.
Right sides togetehr, sew those two pieces together at one of the long ends. Turn to the right side and press. Topstitch close to folded edge.
Now fold strap in half to find the center of the strap. Mark with pin. (actually, you should have the seam there where you sewed the two parts together)
FInd the center of the top edge of the dress by folding it in half. Mark with pin.
Match center of strap to center of dress, right sides together. Sew seam using 1/4 SA. Sew the seam until you come to the edge of the dress.
Now here is the tricky part. It's not hard, just I suck at explaining things. Perhaps you can figure it out fromt the pic.
On either side of the dress, right sides together, sew short edge of seam and then sew long end of strap just until you get to the end of the dress.

Turn strap to right side.

Now, we're almost done! After you turn the straps right side out, then you will fold the free edge to the wrong side 1/4 inch, then stitch to the top of the dress. Topstitch the rest of the length of the strap.
Now, make two button holes. For buttonhole placment, you fold the dress in half, then in half again. Mark that pont, and that is where you would put your buttonhole.
All done!

I know my pictures and instructions are not the best. If you need help, feel free to leave a comment and I can try to help the best I can. Also, if you're having problems with the straps, you can probaby use just about any apron pattern to see how to add straps.


